If you have noticed any damage to your chimney cap or want to ensure its longevity and functionality, this article is for you. We will walk you through the step-by-step process of repairing a chimney cap, from assessing the damage to completing the repair. By following our instructions, you can maintain the integrity of your chimney cap and avoid costly replacements.
A hand holding a metal cap over the top of a brick chimney that is missing pieces, with tools like a hammer and nails nearby. The hand uses pliers to bend the cap’s edges to fit securely onto the chimney. Smoke is seen coming out of the chimney in the background.
Chimney cap repair protects your chimney from debris, animals, and moisture. Neglecting chimney cap maintenance can lead to expensive repairs or even compromise the safety of your home. So, let’s get started on repairing your chimney cap and keeping it in great shape. Read on to learn more.
Understanding the Role of a Chimney Cap
A chimney cap plays a vital role in maintaining the functionality and longevity of your chimney. Let’s take a closer look at what a chimney cap is and why it’s essential to keep it properly.
What is a Chimney Cap?
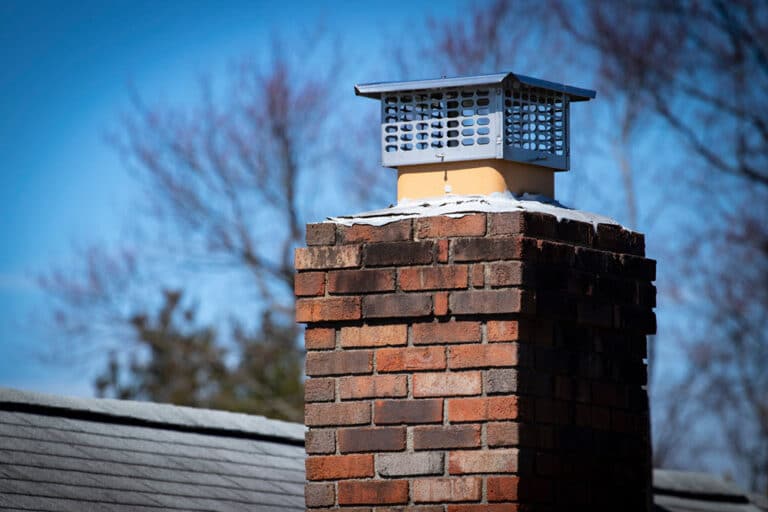
A chimney cap is a protective covering installed on top of a chimney. It is typically made of metal, such as stainless steel or copper, and is designed to cover and protect the chimney opening. The cap is fitted with a mesh screen that allows smoke and gases to escape while preventing debris, animals, and rainwater from entering the chimney.
Significance of Proper Chimney Cap Maintenance
Proper maintenance of your chimney cap is essential for several reasons:
- Debris prevention: A chimney cap acts as a barrier, preventing leaves, branches, twigs, and other debris from entering your chimney. This helps avoid blockages that can hinder proper airflow and ventilation.
- Animal exclusion: Chimney caps are designed with mesh screens that keep birds, squirrels, raccoons, and other animals from nesting or entering your chimney. This ensures the safety of both your chimney and your home.
- Moisture control: Rainwater can cause significant damage to your chimney if allowed to enter through the chimney opening. A chimney cap helps redirect rainwater away from the chimney, reducing the risk of moisture damage, such as rust, deterioration, and mold growth.
By ensuring regular maintenance of your chimney cap, you can prolong its lifespan, prevent costly repairs, and maintain the overall efficiency of your chimney system.
Assessing the Damage to Your Chimney Cap
Before proceeding with the repair, assessing the damage to your chimney cap is essential. You can determine the appropriate repair methods by identifying the signs of chimney cap damage, such as cracks, rust, and loose components.
Inspecting your chimney cap regularly is crucial for maintaining its functionality and preventing further damage. Here are some common signs of chimney cap damage to look out for:
- Cracks: Check for any visible cracks in the chimney cap structure. Cracks can compromise the cap’s ability to keep out debris and moisture.
- Rust: Rust indicates water damage and can weaken the chimney cap’s structure. Look for any rust spots on the surface.
- Loose Components: Examine the chimney cap for any loose parts, such as screws or bolts. Loose components can lead to instability and ineffective performance.
By carefully assessing the damage to your chimney cap, you can determine if it requires repair or replacement. Understanding the extent of the damage is crucial for selecting the appropriate repair methods and ensuring the longevity of your chimney cap.
Common Signs of Chimney Cap Damage
| Signs of Damage | Description |
|---|---|
| Cracks | Visible cracks in the chimney cap structure that compromise its integrity. |
| Rust | Signs of rust on the surface, indicating water damage and potential structural weakness. |
| Loose Components | Any loose parts, such as screws or bolts, that can affect the stability and performance of the chimney cap. |
Preparing for Chimney Cap Repair
Proper preparation is key to a successful chimney cap repair. Before starting the repair process, it’s essential to determine the right time to fix your chimney cap and have a clear timeline for completing the repair. Additionally, you will need specific tools and materials to ensure the repair is done effectively.
When to Repair Your Chimney Cap
Knowing when to repair your chimney cap is crucial in maintaining its functionality and preventing further damage. Look out for signs such as cracks, rust, or loose components. If you notice any of these issues, it’s time to repair your chimney cap to avoid more extensive repairs in the future.
Tools and Materials Needed
To successfully repair your chimney cap, you will need the following tools and materials:
- Chimney Cap Repair Kit: This kit typically includes a replacement cap, adhesive, screws, and any necessary tools for installation.
- Ladder: A sturdy ladder is essential for accessing the chimney cap safely.
- Gloves: Protect your hands with gloves to prevent injuries and secure grip.
- Safety Goggles: Eye protection is necessary to shield your eyes from debris and particles.
- Wire Brush: Use a wire brush to remove rust or debris from the chimney cap before repairing it.
- Screwdriver: A screwdriver will be needed to loosen and tighten screws during the repair process.
- Sealant: Depending on the type of repair needed, you may require a sealant such as silicone or mortar.
With these tools and materials, you’ll be well-prepared to effectively tackle your chimney cap repair.
A toolbox and ladder leaning against a brick chimney, with fallen leaves and debris scattered around the base.
How to Repair a Chimney Cap
In this section, we will guide you through the step-by-step process of repairing a chimney cap. Following these instructions can effectively restore your chimney cap to its optimal condition.
- Step 1: Removing the Old Cap
- To begin the repair process, start by removing the old chimney cap. Carefully detach it from the chimney, ensuring it does not damage the surrounding structure. Use appropriate tools, such as a screwdriver or wrench, depending on the cap’s fastening mechanism.
- Step 2: Repairing or Replacing Damaged Parts
- Once the old cap is removed, thoroughly inspect it for damaged components. If possible, repair minor issues like small cracks or loose joints. However, replacing the affected parts is recommended if the damage is extensive. This will ensure the structural integrity of the chimney cap.
- Step 3: Installing a New Cap
- Next, install the new chimney cap. Follow the manufacturer’s instructions for proper placement and attachment. Ensure the cap fits securely and provides sufficient coverage for the chimney opening. A tight, well-fitted cap will prevent debris, animals, and moisture from entering the chimney.
Once you have completed these steps, your chimney cap repair will be successfully finished. It’s essential to regularly inspect and maintain your chimney cap to prevent future issues and ensure its longevity.
Sealing Cracks and Gaps in the Chimney Cap
Sealing cracks and gaps in the chimney cap is essential to prevent further damage and ensure proper functioning. By addressing these issues promptly, you can prolong the lifespan of your chimney cap and maintain optimal performance.
Identifying Areas That Need Sealing
The first step in sealing chimney cap cracks and gaps is identifying the areas that require attention. Inspect the entire surface of the chimney cap, looking for any visible cracks or gaps. In particular, pay close attention to the junctions between different parts of the chimney cap and any deterioration areas. Use a flashlight to get a clear view, especially when inspecting the cap in dimly lit conditions.
Additionally, if you notice water or debris entering the chimney through certain areas, these may indicate cracks or gaps that need sealing. It’s crucial to inspect to ensure all damaged spots are noticed thoroughly.
Choosing the Right Sealant
When sealing chimney cap cracks and gaps, selecting the appropriate sealant is crucial for long-lasting results. Several types of adhesives are available, each with unique properties and application methods. Here are a few common sealant options:
- Silicone-based sealants: These are known for their durability and flexibility, making them an excellent choice for sealing chimney cap cracks and gaps. Silicone sealants resist temperature changes and can withstand exposure to harsh weather conditions.
- Elastomeric sealants: Elastomeric sealants provide excellent elasticity, allowing them to expand and contract with the chimney cap as it undergoes temperature variations. This flexibility helps to prevent future cracks and gaps.
- Masonry sealants: If your chimney cap is made of masonry materials, such as bricks or concrete, a masonry sealant is ideal for ensuring a secure and watertight seal. These sealants bond effectively with masonry surfaces and provide long-lasting protection.
Before applying any sealant, thoroughly clean the chimney cap surface to remove debris, dirt, or loose materials. Follow the sealant manufacturer’s instructions for proper application, including the recommended drying time and any specific tools or techniques required.
You can effectively prevent further damage and maintain its functionality by sealing the cracks and gaps in your chimney cap. Remember to identify the areas that need sealing and choose the proper sealant to ensure a successful repair.
Replacing a Damaged Chimney Cap
In some cases, repairing a damaged chimney cap may not be feasible, and a replacement is necessary. When extensive damage is present, or the cap has reached the end of its lifespan, replacing the chimney cap ensures your chimney’s continued protection and functionality. A replacement may be the best solution if repairs have been attempted previously and have not resolved the issue.
When determining whether to replace the chimney cap, consider the following factors:
- Extent of damage: Assess the severity of the damage to determine if repair is possible or if a replacement is needed. Major cracks, extensive rust, or significant deterioration may warrant a replacement.
- Age of the cap: Consider the lifespan of the chimney cap. If it is reaching the end of its expected lifespan, a replacement will provide a longer-lasting solution.
- Cost-effectiveness: Compare the cost of repairing the chimney cap versus replacing it. In some cases, a replacement is a more cost-effective option, especially if repairs only provide a temporary fix.
When replacing a damaged chimney cap, it is essential to follow a step-by-step process to ensure proper installation and functionality. Here is a guide for the chimney cap replacement process:
Step 1: Measurements
To ensure a proper fit, measure the dimensions of the existing chimney cap or the chimney’s opening. This will help you choose the correct replacement cap size.
Step 2: Selecting the cap
Research and choose a chimney cap that fits your specific needs. Consider material, design, and features like spark arrestors or animal guards. Look for a high-quality cap that is durable and built to withstand the elements.
Step 3: Removing the old cap
Carefully remove the old chimney cap, noting any attachments or fasteners that need to be detached. Use appropriate tools and caution to avoid damaging the chimney structure or surrounding areas.
Step 4: Preparing the chimney
Clean the chimney surface and remove any debris or loose material. Ensure the area is free from obstructions before installing the new cap.
Step 5: Installation
Follow the manufacturer’s instructions for installing the new chimney cap. Secure it in place using the provided fasteners or brackets, ensuring a tight and secure fit. Double-check that the cap is properly aligned and leveled.
Step 6: Final inspection
Once the new chimney cap is installed, inspect it for any gaps, loose components, or installation errors. Ensure proper ventilation and functionality before considering the job complete.
By following these steps and considering the appropriate circumstances, you can replace a damaged chimney cap effectively and maintain the integrity of your chimney system.
Ensuring Optimal Chimney Crown Performance
When repairing a chimney cap, paying attention to the crown is essential. While the chimney cap protects the chimney’s opening, the crown covers the entire top surface of the chimney structure.
The chimney crown is typically made of concrete or mortar and is a barrier against water intrusion. It prevents moisture from seeping into the chimney and causing damage to the internal components. Unlike the chimney cap, which primarily keeps out debris and animals, the chimney crown plays a more significant role in maintaining the overall integrity of the chimney structure.
Chimney Crown vs. Chimney Cap
While the chimney crown and cap serve essential functions, their purpose and construction differ. The chimney cap is primarily designed to protect the top opening of the chimney from debris, animals, and excessive water infiltration. On the other hand, the chimney crown covers the entire top surface of the chimney structure and provides a barrier against water intrusion.
The chimney crown is typically constructed with a slightly sloping design to ensure proper water runoff. The chimney crown must be appropriately maintained to prevent water damage, such as cracks and deterioration.
Show an overhead view of a homeowner inspecting their chimney cap. They are wearing work gloves and carrying a tool kit. Smoke is billowing out of the chimney in the background, indicating that the fireplace is in use. The sky is cloudy, and leaves are scattered on the roof, implying it is autumn. The focus is on the homeowner’s hands as they replace damaged or missing bricks on the chimney crown.
Techniques for Maintaining an Effective Chimney Crown
Regular maintenance ensures optimal chimney crown performance and prevents water damage. Here are some techniques for maintaining an adequate chimney crown:
- Inspect the chimney crown regularly for any signs of damage, such as cracks or crumbling.
- If you notice any cracks or deterioration, seal them promptly using a high-quality chimney crown sealant.
- Keep the chimney crown clear of debris, such as leaves and twigs, to prevent clogging and water buildup.
- Ensure proper drainage by cleaning the weep holes on the chimney crown. These small holes allow water to drain out, preventing pooling and potential damage.
- If you live in an area prone to severe weather conditions, consider applying a waterproofing sealant to the chimney crown to provide additional protection against water intrusion.
By following these maintenance techniques, you can ensure the longevity and effectiveness of your chimney crown, ultimately safeguarding your chimney and preventing costly repairs in the future.
Addressing Common Chimney Cap Issues
Over time, chimney caps can encounter various common issues that may affect their functionality. It’s essential to be aware of these problems and take appropriate measures to address them promptly. Some of the most common chimney cap issues include:
- Rust: One of the primary concerns with chimney caps is rust formation due to exposure to moisture and changing weather conditions. Rust affects the aesthetic appeal of the cap and can lead to structural damage over time. Regular inspection and timely treatment can help prevent rust from worsening and ensure the longevity of your chimney cap.
- Debris Buildup: Another issue often encountered with chimney caps is the accumulation of debris, such as leaves, twigs, and other foreign objects. This can obstruct the proper airflow and lead to chimney fires. Regular cleaning and maintenance can prevent debris buildup and keep your chimney cap free from blockages.
- Animal Nesting: Chimney caps are designed to keep animals out of your chimney. However, some persistent creatures may attempt to build nests inside. This can cause blockages foul odors, and pose potential fire hazards. Preventive measures such as installing chimney cap mesh or wire guards can help deter animals from entering your chimney.
When facing these common chimney cap problems, it’s essential to take prompt action to prevent further damage and maintain the efficiency of your chimney. By addressing these issues, you can ensure that your chimney cap continues to serve its purpose effectively and protect your home.
Mitigating Future Chimney Cap Problems
Taking preventative measures is crucial for avoiding future chimney cap problems. By following these tips, you can extend the lifespan of your chimney cap and ensure its proper functioning for years to come.
Preventative Measures to Take
- Regular Cleaning: Clean your chimney cap at least once a year to remove debris, such as leaves, twigs, and bird nests. This will prevent blockages and ensure proper airflow.
- Weatherproofing: Apply a weather-resistant sealant to protect your chimney cap from rain, snow, and extreme temperatures. This will help prevent rust and deterioration.
- Trim Tree Branches: Trim any overhanging tree branches near your chimney to prevent them from falling onto the cap and causing damage.
- Install Mesh Screen: Consider installing a mesh screen over your chimney cap to prevent animals, birds, and debris from entering. This will help keep your chimney cap and chimney clean and blockage-free.
- Keep Gutters Clean: Maintain clean gutters to prevent water overflow. Clogged gutters can lead to water damage, affecting your chimney cap.
The Importance of Regular Inspections
Scheduling regular inspections by a qualified chimney professional is essential for identifying and addressing potential issues before they become significant problems.
During an inspection, a professional can assess the condition of your chimney cap, identify any signs of damage or deterioration, and recommend the necessary repairs or maintenance. You can save time and money on extensive repairs by catching issues early on.
Regular inspections also ensure that your chimney cap is functioning properly and up to code, minimizing the risk of chimney fires and other safety hazards.
| Issue | Solution |
|---|---|
| Rust | Remove rust using a wire brush and apply a rust-resistant paint or coating. |
| Debris Buildup | Regularly clean your chimney cap to remove debris and keep it free from blockages. |
| Animal Nesting | Install a mesh screen to prevent animals from entering and nesting in your chimney cap. |
Conclusion
In conclusion, proper maintenance and timely repairs are paramount for the longevity and functionality of your chimney cap. You can effectively address any issues by following the step-by-step process of assessing the damage, preparing for the repair, and understanding the role of a chimney cap.
Regular inspections and preventative measures, such as sealing cracks and gaps, will help mitigate future problems, including rust, debris buildup, and animal nesting. Remember to address the chimney crown as well, as it plays a vital role in maintaining optimal performance.
Whether you repair or replace your damaged chimney cap, it’s essential to prioritize maintenance to prevent further damage and ensure its effectiveness. By taking these measures, you can enjoy a well-protected chimney that functions properly and provides peace of mind.
FAQ
What is a chimney cap?
A chimney cap is a protective covering on top of a chimney. Its role is to keep out debris, prevent animals from entering the chimney, and reduce moisture buildup.
Why is proper maintenance of a chimney cap essential?
Proper maintenance of a chimney cap is crucial for its effectiveness. It ensures the cap keeps out debris, prevents animal entry, and reduces moisture buildup. Regular maintenance helps prolong the lifespan of the chimney cap.
What are the signs of damage to a chimney cap?
Some common signs of chimney cap damage include cracks, rust, and loose components. It’s essential to assess the extent of the damage to determine the appropriate repair methods.
When should I repair my chimney cap?
It’s necessary to repair a chimney cap when there is visible damage, such as cracks, rust, or loose components. Timely repairs help prevent further damage and ensure the cap’s proper functioning.
What tools and materials do I need for chimney cap repair?
You may need tools for chimney cap repair, including a screwdriver, pliers, wire brush, and sealant. The materials required may include chimney cap replacement parts, such as a new cap or sealant.
How do I repair a chimney cap?
To repair a chimney cap, you need to remove the old cap, repair or replace damaged parts, and install a new cap. Following a step-by-step guide will help you complete the repair effectively.
How can I seal cracks and gaps in the chimney cap?
To seal cracks and gaps in the chimney cap, you first need to identify the areas that require sealing. Then, choose an appropriate sealant for the job, such as a chimney crown sealant or silicone caulk.
When is it necessary to replace a chimney cap?
If a chimney cap is severely damaged or cannot be effectively repaired, it may be necessary to replace it. Signs that replacement is needed include extensive rust, structural integrity issues, or missing/broken components.
What is the difference between a chimney crown and a chimney cap?
A chimney crown is the masonry surface that covers the top of the chimney stack. It serves to protect the chimney and direct water away. On the other hand, a chimney cap is a protective covering that sits on top of the crown and offers additional protection against debris and animal entry.
How can I address common issues with a chimney cap?
Common issues with a chimney cap include rust, debris buildup, and animal nesting. Solutions may involve cleaning the cap, removing debris, and preventing animals from entering.
What preventative measures can I take to avoid chimney cap problems?
Preventative measures to avoid chimney cap problems include:
- Regular cleaning and inspections.
- Ensuring proper ventilation.
- Installing chimney caps with screens.
- Addressing any issues promptly.
Why are regular inspections necessary for chimney caps?
Regular inspections help identify any potential issues with chimney caps early on. This allows for timely repairs and maintenance, preventing further damage and ensuring optimal functionality.